After activating the Organized Docs plugin, you can use the Quick Start guide to begin creating Docs right away. On the other hand, you could set up all (or some) of your Docs Categories first.
Follow these steps to set up Categories for your Docs.
- In your WordPress dashboard, go to “Docs –> Docs Categories”.
- Add a new category for each product that you will create docs for.
- The Category Name should be the name of your product.
- Leave the “Slug” blank; it should get filled in automatically.
- Leave the “Parent” set to “None”.
- The “Description” is optional.
- Optional: enter a sort-order number for “Sort Order Number for a Top-level Item”. This lets you customize the order on the main Docs page. Number 1 will appear first, while greater numbers appear lower. Numbers do not have to be consecutive; for example, you could number them like, 10, 20, 35, 45, etc. This would leave room in between to insert new Top-level Items later without having to change all current numbers.
- Leave “Sort Order Number for Sub-heading” blank.
- Click “Add New Category“.
- Repeat this for each product that you will create docs for. These should all be top-level categories. (You can add just 1 at first, then add more as you need them.)
- While still in “Docs –> Docs Categories”, decide which subheadings you need for each product’s docs. For example, one product may need:
- Setup Instructions
- General
- Troubleshooting
Another product may need
- Installation and Setup
- Theme Options
- Adding Content
(Note: these subheadings can also be added later. You can add these now, or while creating a Doc article, later.)
These sections are not 1-page posts. They are subheadings that will group together more than one article.
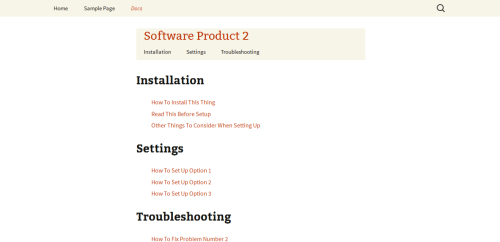
For example, in this picture, the subheadings are Installation, Settings, and Troubleshooting:If you need more help to decide on a structure for your Docs Categories, see Decide How To Organize Your Docs.
-
Once you decide on the subheadings you need for each product, add each subheading to “Docs –> Categories”.
- You’re going to add each subheading as a “Category.”
- Enter the “Name” of your subheading. (for example “Installation and Setup”
- Leave the “Slug” blank; it should get filled in automatically.
- Select the correct “Parent” product. The parent is the Product that this subheading goes under.
- The “Description” is optional.
- Leave “Sort Order Number for a Top-level Item” blank.
- Optional: enter a sort-order number for “Sort Order Number for Sub-heading” to order it under its Parent. Number 1 will appear first, while greater numbers appear lower. Numbers do not have to be consecutive; for example, you could number them like, 10, 20, 35, 45, etc. This would leave room in between to insert new sub-headings later without having to change all current numbers.
- Click “Add New Category“.
- Repeat this step for each of your necessary subheadings. You don’t have to do this ahead of time. You can add these subheadings while your are creating a new documentation article, later. I find it easier to set some up here beforehand.
Next, please see the quick start guide for How to create Docs.

Carolina Suarez
February 24th, 2017 at 7:22 pm
Hi Isa,
I am totally new and need to know how can the user see the table of contents and the related docs.
Should I add the doc into a page?
Thanks!
Isabel
February 27th, 2017 at 12:24 am
To show the main Docs page on the front of your site, you will need to add that page to your site’s menu. To add the main Docs page to your site’s menu, please see this.
Sean
February 9th, 2018 at 3:49 pm
Good Afternoon, I seem to be having some difficulty with this plugin that i’m hoping you can resolve. For starters, i have entered in my documents as posts as i would prefer them to be in the sidebar than in the table of contents. It seems that because i’ve chosen to go this route, the posts are now show as duplicate entries in the table of contents under a different category. How can i fix this?
Isabel
February 11th, 2018 at 12:38 pm
The documents should be entered as “Docs” not as “Posts.” If you enter them as Posts, then this plugin cannot organize them. As Docs, you will be able to show them in the sidebar. The Table of Contents will be in the sidebar of any of the Docs posts.