This is how to host a Namecheap domain on your GoDaddy hosting account. You may have tried adding GoDaddy nameservers to your Namecheap custom DNS settings. You may have noticed that it didn’t work. On this page, you’ll learn how to host your Namecheap domain on a GoDaddy hosting account.
You’ll also learn how to use a GoDaddy Workspace Email account, also known as webmail, with your Namecheap domain.
To clarify, this is for a domain that is registered on Namecheap, and you want to host the site on GoDaddy.
This assumes that you have already purchased your GoDaddy hosting account. This also assumes that you have already added the domain to your GoDaddy hosting account. For example, you may have added it as an “Addon Domain” to your cPanel hosting. This also assumes that you’ve already placed the website files in the GoDaddy hosting account “public_html” directory.
(Or, in the “public_html/addonsite.com” directory, for Addon domains.)
(Or, in the “html” directory, for Classic Web Hosting without cPanel.)
At this point, all you need is for your domain to point to that hosting account. This requires two steps. First, you first have to get the IP address of your GoDaddy hosting account. Then, you have to enter that IP address in the Namecheap Advanced DNS settings. I’ll explain these two steps in detail.
Step 1 – Get The IP Address of Your GoDaddy Hosting Account
The way to get your hosting IP address depends on which type of hosting account you have. Here are two examples of getting the IP address. The first example is for GoDaddy “Linux Hosting with cPanel” accounts. The second example is for GoDaddy “Classic” and/or “Web Hosting Linux” accounts.
Get the IP Address For a GoDaddy cPanel Hosting Account
Log in to your GoDaddy account. Click “Web Hosting.” Next to your cPanel hosting account, click “Manage.”
You’ll see the IP address for this hosting account on the left. Copy it down because you are going to need it in Step 2. See this image for an example.

Get the IP Address For a GoDaddy “Classic” or “Web Hosting” Account
This example is for GoDaddy “Classic” hosting accounts, and for “Web Hosting” accounts that do not have cPanel.
Log in to your GoDaddy account. Click “Web Hosting.” Next to your “Web Hosting” or “Classic Hosting” account, click “Manage.”
On the left, scroll down to where it says, “Server Details.” That is where you’ll see the IP address. Copy it down because you are going to need it in Step 2. See this image for an example.

Step 2 – Setting The Namecheap Advanced DNS Settings
Now you are going to set your Namecheap Advanced DNS settings so that your domain will point to your GoDaddy hosting.
Log in to your Namecheap account. Click “Domain List” to go to the list of your domains. Then, next to the domain that you want to point to GoDaddy, click “Manage.” See the following image for an example.

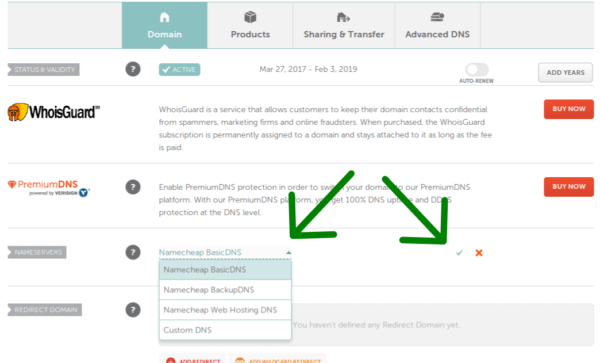
Look down at the “NAMESERVERS” setting. Make sure that it is set to “Namecheap BasicDNS.” If it’s not, then click the drop-down arrow, and select “Namecheap BasicDNS.” Click the green arrow to save your changes. See the following image for an example.
Next, click “Advanced DNS” at the top. On the Advanced DNS page, you are going to add the two necessary records to point your domain to your GoDaddy hosting account. We need one “A Record” and one “CNAME Record” in order to make sure that your website can be reached with, and without, the “www” at the beginning.
Add The A Record
In the HOST RECORDS section, click “ADD NEW RECORD” and select “A Record.”

In the Host column, type the @ symbol. In the Value column, paste the IP address for your GoDaddy hosting account. This is the IP address that you got in Step 1, above.
For the TTL column, you can leave it as Automatic. Click the green arrow to save this record.
Add The CNAME Record
This CNAME Record will make sure that your website can also be accessed with “www” at the beginning.
In the same HOST RECORDS section, click “ADD NEW RECORD” and select “CNAME Record.” Enter www for the Host. In the Value column, type your domain name. That is, just the domain name without any prefixes. For example, mysite.com. Leave the TTL column as Automatic. Click the green arrow to save this record.
Delete Default Namecheap DNS Settings
While you are still on the Advanced DNS page, delete any “URL Redirect Records” that were there by default. Also delete the default CNAME Record that was there. This is the CNAME Record that has parkingpage.namecheap.com. in the Value column. You can delete these records by clicking the trash icon next to each one. Do not delete the two records that you just created. See the following image for the records that you must delete. The records that you must delete are within the red box.

Yes, delete them. It will be okay. You should only leave intact the new “A Record” and “CNAME Record” that you just created. After you delete the default CNAME Record and URL Redirect Record, you should be left with only the two records that you created.
You are finished pointing your Namecheap domain to your GoDaddy hosting account. Now, it’s only a matter of time until this change takes effect. You are probably wondering exactly how long this will take. I’ve seen some changes take effect as soon as 15 minutes. Others can take several hours. We are told that these changes can take up to 72 hours, but I’ve never experienced it taking that long.
Be sure to clear your browser’s cache when you want to see if the change took effect.
Optional Step 3 – Set Up GoDaddy Workspace Email With Your Namecheap Domain
GoDaddy Workspace Email is also known as GoDaddy webmail. If you want to use this Namecheap domain for a GoDaddy Workspace Email, you’ll have to add a few more records. These records will be added on the same Namecheap “Advanced DNS” page that we were on for Step 2.
I will walk you through setting these records as per the default GoDaddy email server settings. However, before you continue, you should check to make sure that your email server settings are the same as these. To check this, log in to your GoDaddy account. Click “Manage” next to Workspace Email. You will be taken to the page that lists all your GoDaddy Email accounts. From the top menu, Click Tools, then click Server Settings.
Your MX Records will pop up. If your MX Records and Host Names (CNAME) are the same as in the following image, then you can follow my steps. If yours are records are different, then follow my steps, but modify the Values in my steps to match your own records.

Now, we are going to set the three required CNAME records, and two MX records.
Add The Mail CNAME Records
Just like you did in Step 2, in the HOST RECORDS section, click “ADD NEW RECORD” and select “CNAME Record” for each of these 3 records.
- Add a CNAME Record. Enter
popfor the Host. Enterpop.secureserver.netfor the Value. Leave the TTL as Automatic. Click the green arrow to save. - Add a CNAME Record. Enter
imapfor the Host. Enterimap.secureserver.netfor the Value. Leave the TTL as Automatic. Click the green arrow to save. - Add a CNAME Record. Enter
smtpfor the Host. Entersmtpout.secureserver.netfor the Value. Leave the TTL as Automatic. Click the green arrow to save.
Add The Mail MX Records
Scroll down to the MAIL SETTINGS section. Add the two MX Records in this section.
- Under MAIL SETTINGS, click “ADD NEW RECORD.” Enter
@for the Host. Entersmtp.secureserver.netfor the Value. Enter0for the Priority. Leave the TTL as Automatic. Click the green arrow to save. - Under MAIL SETTINGS, click “ADD NEW RECORD.” Enter
@for the Host. Entermailstore1.secureserver.netfor the Value. Enter10for the Priority. Leave the TTL as Automatic. Click the green arrow to save.
You are finished setting your MX Records for your email. These changes can take effect within 15 minutes, or as late as 48 hours later. After these changes take effect, you’ll be able to use this domain for a GoDaddy Workspace Email account.
I hope you found this tutorial useful for managing Namecheap domains with GoDaddy hosting.
Udoro Essien
November 3rd, 2019 at 5:49 pm
Thank you Isabel, your article saved me days of frustration.
Julian Taboada
July 27th, 2019 at 8:53 pm
Thanks for writing this Isabel! These instructions for domain pointing worked perfectly for me, as I build a client website on GoDaddy’s WordPress web hosting.
Cheers
Veronica Kawka
May 20th, 2019 at 11:29 am
Thank you so much !!! I have been stuck for weeks as well as others.
Carlos
February 12th, 2019 at 5:51 pm
Thank you so much!
Larry
February 3rd, 2019 at 3:18 pm
Thanks. You rock.
Max
June 21st, 2018 at 3:09 pm
OMG… Where is the tip jar?!?! Lifesaver!
ak
June 19th, 2018 at 10:12 pm
Thank you!
Admin Maps
April 10th, 2018 at 12:30 pm
It’s frustrating to wait for Godaddy’s hosting to receive the new DNS changes, it’s Godaddy’s hosting problem. It is always said that the change can last up to 72 hours, but in practice most companies last about 15 minutes. It is poor of Godaddy and I have already done the test, I have service with hostinger and another with godaddy, if I point the domain to hostinger it takes a couple of minutes, if I point the domain to godaddy sometimes it takes days.
eddy
March 29th, 2018 at 8:21 am
awww…you’re the best ..better than those who works for godaddy while its their service…
technodiva
March 6th, 2018 at 2:59 pm
What would I need to write in Namecheap to setup a subdomain, on a GoDaddy server?
technodiva
March 6th, 2018 at 12:42 pm
Great article! Very helpful!
Manu
February 23rd, 2018 at 8:35 pm
I just came back to say Thanks.
Rick
September 21st, 2017 at 1:25 pm
Big thanks for writing this! Surprised that neither Godaddy or NC made this easy to figure out.
sara
August 9th, 2017 at 11:34 pm
thanks for this, this was really helpful. I was on hold with a namecheap customer rep online when I thought I could google this and just learn it more quickly. And your blog post did just that! I figured it out before they even got back to me. 🙂
Ikenna Gabriel Ifenna
August 4th, 2017 at 6:18 am
Thank you very much for this info. I really do appreciate it a lot. You saved me days of frustration and giving up. Namecheap should make this clear that things doesnt just work out by you changing your nameservers from their own to Godaddy’s own.
Rob
June 29th, 2017 at 2:46 pm
Thank you so much for writing this article! I have been stumped for weeks trying to set up my site; kept getting frustrated, waiting 24-48 hours and giving up to try again a few days later. Have just changed the settings, and if you never hear from me again, well, it worked!
Isabel
January 31st, 2018 at 10:22 am
Glad to help.
Jake
May 23rd, 2022 at 11:16 pm
This worked perfectly. Thank you Isabel!