This page is for WordPress plugin authors who want to allow users of their plugin to use the WordPress Customizer to customize image colors in an image. Specifically, this is for an image that is created dynamically with PHP and output with the imagepng function. This will allow you to “live preview” that image in the WordPress customizer, and edit its colors.
(Although this is done successfully with an image output with imagepng, it should work as well with images output with imagejpeg.)
This assumes you are creating a plugin with some script which generates an image with PHP, and this image is displayed somewhere on a page or post. Here I will show you how you can allow users of your plugin to customize the colors of this image in the WordPress customizer.
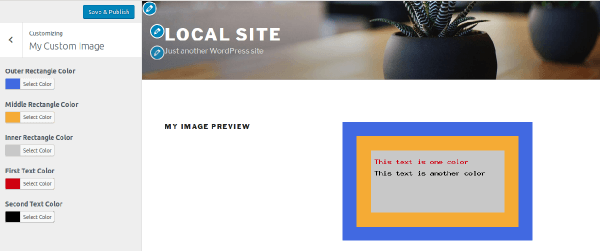
This will create a new tab section in the WordPress customizer, and when this customizer tab is opened, the customizer will display the image, and it will allow custom colors to be previewed live, as they are selected in the customizer settings. This means the PHP-generated image will be refreshed automatically in the customizer with the new colors. The user will be able to use the customizer settings to preview new colors on the image before saving any changes.
-
Step 1: Make Sure Your Image Script Works
To begin with, this assumes you already have some script that creates an image with PHP. It’s not my purpose to show how to create an image with PHP; my purpose is to show you how the image colors can be customized in the WordPress customizer.
So, before we continue, make sure that your image is displayed properly. As an example, I’ll use this sample script to create an image with PHP:
<?php
header ('Content-Type: image/png');

$x = 400;
$y = 250;
$offset	= 30;

// Create the image

$im = @imagecreatetruecolor( $x, $y ) or die( 'Cannot initialize new GD image stream' );

// Define colors

$black = imagecolorallocate($im, 0, 0, 0);
$red = imagecolorallocate($im, 207,0,15);
$blue = imagecolorallocate($im, 65,105,225);
$orange = imagecolorallocate($im, 245, 171, 53);
$gray = imagecolorallocate($im,200,200,200);

// Color the image

imagefilledrectangle( $im, 0, 0, $x, $y, $blue );
imagefilledrectangle( $im, $offset, $offset, $x - $offset, $y - $offset, $orange );
imagefilledrectangle( $im, $offset * 2, $offset * 2, $x - ($offset * 2), $y - ($offset * 2), $gray );

// Add text to the image

imagestring( $im, 5, 8+($offset * 2), 16+($offset * 2), 'This text is one color', $red );
imagestring( $im, 5, 8+($offset * 2), 40+($offset * 2), 'This text is another color', $black );

// Output the image

imagepng( $im );

imagedestroy( $im );
?>
The sample script creates this image:
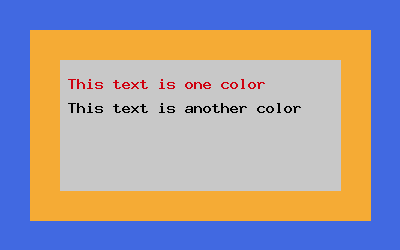
Image created with PHP imagecreatetruecolor() and imagepng()
The image script, above, is saved in a separate file called
image.php. This file would be placed inside your plugin.For this example, I’ll use the following function which calls that script to get the HTML image element:
/**
 * Returns the HTML image element
 */
function my_get_image() {
	$src = plugin_dir_url( __FILE__ ) . 'image.php';
	$out = '<img src="' . esc_url( $src ) . '" class="my-custom-image" alt="my image" />';
	return $out;
}
For your own image, you need to have some function that gets and returns your image as an HTML string, just like the one above. This function will be necessary later, in order to show the image in the customizer. For this example, we will use the function,
my_get_image().Important: notice that I gave the image a class attribute of
my-custom-image. It’s necessary for you to give your image element a class selector because we will use that class selector later in our customizer script.To display the image, you would use this:
<?php echo my_get_image(); ?>
-
Step 2: Add a Custom Tab Section To The WordPress Customizer
Now, we are going add a custom tab to the WordPress customizer for the purpose of customizing the colors for our image.
The sample image script, above, creates a gray rectangle, within an orange rectangle, within a blue rectangle. The image also has some red text and some black text. That makes 5 different colors that we want to be able to edit in the customizer.
We’ll set up 5 customizer settings, one for each of the colors that I want to allow to be changed in the image. The following PHP class takes care of this.
The 5 default colors for the 5 settings are on lines 11–34 (below). For each setting, I give a unique key (no spaces), the HTML hex color code for the default color, and a human-readable name. For example, on line 11, the unique key is
outer_rectangle_color. On the next line is its default color,#4169e1. On the next line is the human-readable name,Outer Rectangle Color. You can add to this array as many colors as you need.Notice that we are using hex color codes here, but the image script in Step 1 uses rgb values for the colors. To get the default colors to enter here, I had to look up the rgb colors from my image script, and get the hex equivalents. You will have to do the same for your own colors that you use in your image script. You will find the rgb values in theimagecolorallocatecalls in your image script.Another thing that may have to be edited in the following class is line 112. On line 112, we use the function
my_get_image()to get our image. You can changemy_get_image()to the function that gets your own image. (Or leave it as is, if you’re using my sample image script and my samplemy_get_image()function from Step 1.)The following class can be saved in its own file, named
class-my-image-customize.php. Then you can include the class in your plugin using:require_once plugin_dir_path( __FILE__ ) . 'class-my-image-customize.php';And this is the class:
<?php /** * Adds an image color editor to the Customizer. */ class My_Image_Customize { /** * Get default colors */ private static function default_colors() { $defaults = array( 'outer_rectangle_color' => array( '#4169e1', __( 'Outer Rectangle Color', 'textdomain' ) ), 'middle_rectangle_color' => array( '#f5ab35', __( 'Middle Rectangle Color', 'textdomain' ) ), 'inner_rectangle_color' => array( '#c8c8c8', __( 'Inner Rectangle Color', 'textdomain' ) ), 'first_text_color' => array( '#cf000f', __( 'First Text Color', 'textdomain' ) ), 'second_text_color' => array( '#000000', __( 'Second Text Color', 'textdomain' ) ), ); return $defaults; } /** * Setup the Customizer settings and controls */ public static function register( $wp_customize ) { $wp_customize->add_section( 'my_image_colors', array( 'title' => __( 'My Custom Image', 'textdomain' ) ) ); foreach( self::default_colors() as $key => $value ) { $wp_customize->add_setting( "my_image_customizer[$key]", array( 'type' => 'option', 'default' => $value[0], 'sanitize_callback' => 'sanitize_hex_color', 'transport' => 'postMessage' ) ); $wp_customize->add_control( new WP_Customize_Color_Control( $wp_customize, "my_image_$key", array( 'settings' => "my_image_customizer[$key]", 'label' => $value[1], 'section' => 'my_image_colors' ) ) ); } } // Load the js to handle the live preview public static function scripts() { wp_enqueue_script( 'my-image-customize', plugin_dir_url( __FILE__ ) . 'assets/js/my-image-customize.js', array( 'customize-controls' ) ); wp_localize_script( 'my-image-customize', 'my_image_colors', array( 'root' => esc_url_raw( rest_url() ), 'nonce' => wp_create_nonce( 'wp_rest' ), 'page_title' => __( 'My Image Preview', 'textdomain' ), 'ajaxurl' => admin_url( 'admin-ajax.php' ) ) ); } /** * Merge settings with defaults to use default colors for any blank settings */ public static function merge_settings( $settings ) { // array of default values foreach( self::default_colors() as $k => $v ) { $defaults[ $k ] = $v[0]; } $merged = array_merge( array_filter( $defaults, 'strval' ), array_filter( $settings, 'strval' ) ); return $merged; } /** * Gets My Image customizer settings. */ public static function get_settings() { $settings = get_option( 'my_image_customizer', array() ); return apply_filters( 'my_image_customizer_get_settings', $settings ); } /** * The shortcode to display a live preview of the image in the customizer when it is first opened */ public static function preview_shortcode( $atts ) { return wp_kses_post( my_get_image() ); } } // Setup the Customizer settings and controls add_action( 'customize_register', array( 'My_Image_Customize', 'register' ) ); // Take care of any settings left blank add_filter( 'my_image_customizer_get_settings', array( 'My_Image_Customize', 'merge_settings' ) ); // Enqueue live preview javascript in Theme Customizer admin screen add_action( 'customize_controls_enqueue_scripts' , array( 'My_Image_Customize', 'scripts' ) ); add_shortcode( 'my_image_customizer_preview', array( 'My_Image_Customize', 'preview_shortcode' ) ); -
Step 3: Add The JavaScript For The Customizer To Handle Live Previews
The class, above, loads a
.jsfile on line 73. Notice that it is namedmy-image-customize.jsand its path isassets/js/. We are going to create that file, now. You should edit line 73, above, according to where you’ll place this.jsfile in your plugin.Our customizer JavaScript file will do more than handle live previews of the colors. It also makes sure that when you click on the “My Custom Image” tab inside the customizer, the customizer preview pane will open to our custom image. Then, when you close the “My Custom Image” tab, it will return to whatever page the customizer was previously showing.
To make this work, we use the WordPress REST API to create a temporary draft of a page from within the customizer JavaScript. This page draft is created “on the fly” when our tab section is opened. This page will display our image. When our customizer tab is closed, this temporary page draft will be deleted (using the WordPress REST API). It may sound like a better idea to simply use a back-end admin page for this purpose, but that will not work because, currently, the WordPress customizer will not allow a live preview of admin pages. It only allows live preview of public-facing pages.
Save the following JavaScript and name it
my-image-customize.js. (Remember to edit line 73 in Step 2, above, according to where you place this file.)In the following JavaScript, you would only have to edit 2 things.
First, lines 17 and 18 have the list of unique keys for our customizer settings. These should be exactly the same as the unique keys on lines 11–34 in Step 2. If you added settings there, then you should also add the keys here.
Second, you would have to change
my-custom-imageat the end of line 44, to the class selector that you gave your image. Remember the important note from the end of Step 1, above: It’s necessary for you to give your image element a class selector because we will use that class selector later in our customizer script. Well, this is where you need to use the class selector for your image. If you’re using my sample image script, you can leavemy-custom-imageas it is on line 44.( function( $ ) { 'use strict'; wp.customize.section( 'my_image_colors', function( section ) { // Set a custom Preview URL only for My Image section var previousUrl, clearPreviousUrl, previewUrlValue, previewPageID; previewUrlValue = wp.customize.previewer.previewUrl; clearPreviousUrl = function() { previousUrl = null; }; section.expanded.bind( function( isExpanded ) { var keys, myGetSettings, replaceImage; if ( isExpanded ) { keys = ['outer_rectangle_color','middle_rectangle_color','inner_rectangle_color', 'first_text_color','second_text_color']; // Grab all our live customizer 'My Image' settings, even those not saved yet myGetSettings = function () { var settings = {}; keys.forEach(function(element) { settings[element] = wp.customize.value('my_image_customizer[' + element + ']')(); }); return settings; }; // Replaces the image with a new image with new colors replaceImage = _.debounce(function (e) { // Get new image $.ajax({ url: my_image_colors.ajaxurl, type: "POST", data: { action: 'my_image_customize_preview_image', post_data: myGetSettings() }, dataType: "json", success: function( data ) { var myImageElement = $('#customize-preview iframe').contents().find('.my-custom-image'); myImageElement.replaceWith( data.image ); } }); }, 1000); // Hide the close-customizer button since I need to detect when this section closes // which can only be detected upon closing the section, not closing the customizer. $( '.customize-controls-close' ).hide(); // Create the page for our live preview $.ajax({ method: "POST", url: my_image_colors.root + 'wp/v2/pages', data: { title: my_image_colors.page_title, content: '[my_image_customizer_preview]', type: 'page', status: 'draft' }, beforeSend: function ( xhr ) { xhr.setRequestHeader( 'X-WP-Nonce', my_image_colors.nonce ); }, success : function( response ) { // save the page id so we can delete it when finished previewPageID = response.id; // set the live preview URL previousUrl = previewUrlValue.get(); previewUrlValue.set( response.link ); previewUrlValue.bind( clearPreviousUrl ); } }); // Update colors in real time keys.forEach(function(element) { wp.customize( 'my_image_customizer[' + element + ']', function( value ) { value.bind( replaceImage ); }); }); } else { // When section closes... $( '.customize-controls-close' ).show(); // Upon closing the 'My Image' section, return to the previous preview URL previewUrlValue.unbind( clearPreviousUrl ); if ( previousUrl ) { previewUrlValue.set( previousUrl ); } // delete the My Image preview page if ( previewPageID ) { $.ajax({ method: "DELETE", url: my_image_colors.root + 'wp/v2/pages/' + previewPageID + '?force=true', beforeSend: function ( xhr ) { xhr.setRequestHeader( 'X-WP-Nonce', my_image_colors.nonce ); } }); } } // end section closes } ); } ); } )( jQuery ); -
Step 4: Create AJAX Handler To Update The Image In The Customizer
The JavaScript file, which we created above, uses AJAX to handle live previews in the customizer. It uses AJAX to replace the image with a new image, with updated colors. Now, we need a function to handle our AJAX request to get an updated image.
You will need to add the following AJAX handler to your plugin. The only thing to edit here is line 11, in which you have to replace
my_get_image( $colors )with your own function that gets your own image (unless you’re using my samples). Notice that this function must have$colorspassed to it./** * Handles ajax request to get an updated image for the live color preview for customizer. */ function my_ajax_get_customizer_image() { $colors = array(); foreach( $_POST['post_data'] as $k => $color ) { $colors[ $k ] = sanitize_hex_color( $color ); } $image = wp_kses_post( my_get_image( $colors ) ); echo json_encode( array( 'image' => $image ) ); wp_die(); } add_action( 'wp_ajax_my_image_customize_preview_image', 'my_ajax_get_customizer_image' ); add_action( 'wp_ajax_nopriv_my_image_customize_preview_image', 'my_ajax_get_customizer_image' ); -
Step 5: Modify my_get_image() To Allow Custom Colors
Now, we have to modify the
my_get_image()function to allow custom colors to be passed to the function, so that the colors can be passed to the image.I’m going to modify my
my_get_image()function from Step 1. You can make the changes in your own function that gets your image, as needed.The first change is to add a parameter to the function:
$colors. The function now begins like this:function my_get_image( $colors = false ) {Inside the function, at the very top, insert this to check for colors:
	if ( empty( $colors ) ) {
		$customizer_settings = My_Image_Customize::get_settings();
	} else {
		// incorporate live customizer colors that are not yet saved
		$customizer_settings = My_Image_Customize::merge_settings( $colors );
	}

	$encoded_settings = rawurlencode( serialize( $customizer_settings ) );
The last line, above, serializes and encodes the customizer color settings so that we can pass these customizer settings to the image script.
Next, we are going to change the image
src. The original one (line 5 in themy_get_image()function in Step 1) looks like this:$src = plugin_dir_url( __FILE__ ) . 'image.php';
We are going to add a query string that passes the customizer settings to the image script. To do this, change that line to this:
$src = plugin_dir_url( __FILE__ ) . 'image.php?mycustomimage=' . $encoded_settings;
So, the entire function now looks like this:
/** * Returns the HTML image element */ function my_get_image( $colors = false ) { if ( empty( $colors ) ) { $customizer_settings = My_Image_Customize::get_settings(); } else { // incorporate live customizer colors that are not yet saved $customizer_settings = My_Image_Customize::merge_settings( $colors ); } $encoded_settings = rawurlencode( serialize( $customizer_settings ) ); $src = plugin_dir_url( __FILE__ ) . 'image.php?mycustomimage=' . $encoded_settings; $out = '<img src="' . esc_url( $src ) . '" class="my-custom-image" alt="my image" />'; return $out; } -
Step 6: Modify The Image Script To Accept Custom Colors
We have to modify the image script to allow for custom color choices. Our image script in this example is the file
image.phpfrom Step 1.The first change we are going to make is to insert this at the very top of the image script, above the header line:
if ( isset( $_GET['mycustomimage'] ) ) {
	$customizer_raw = unserialize( $_GET['mycustomimage'] );
	foreach ( $customizer_raw as $key => $value ) {
		$hex = my_custom_image_sanitize_data( $value );
		// Convert customizer hex colors to rbg values
		$customizer_rgb[ $key ] = my_custom_image_hex2rgb( $hex );
	}
}
That makes the image script check for customizer settings which are being passed to it as a query string. It sanitizes the values and converts the hex color codes to rgb values so that our image script can use these colors. Here, we’ve introduced two new functions, so we will add those function to the very end of the image script. Add the following to the end of the image script, after the
imagedestroyline:/** * Strip all tags and whitespace */ function my_custom_image_sanitize_data( $data ) { $data = preg_replace( '@<(script|style)[^>]*?>.*?</1>@si', '', $data ); $data = strip_tags($data); $data = preg_replace('/[rnt ]+/', ' ', $data); return trim( $data ); } /** * Convert hex color code into array of rgb values * @return array with the r,g,b values */ function my_custom_image_hex2rgb( $hex ) { $hex = ltrim( $hex, '#'); if(strlen($hex) == 3) { $r = hexdec(substr($hex,0,1).substr($hex,0,1)); $g = hexdec(substr($hex,1,1).substr($hex,1,1)); $b = hexdec(substr($hex,2,1).substr($hex,2,1)); } else { $r = hexdec(substr($hex,0,2)); $g = hexdec(substr($hex,2,2)); $b = hexdec(substr($hex,4,2)); } return array($r, $g, $b); }Now, we have to set default colors and make sure that customizer settings will override the defaults. We are going to create some abstraction to allow for this.
To do this, we’ll create a variable for each of our customizer settings. The variable will be set to the default color for that setting, unless a customizer setting is found for that setting.
Remember that you can see our settings in Step 2, lines 11–34. We have 5 settings, so here are the 5 variables that I’ll use:
// Set default colors and override with Customizer colors

$outer_rectangle_color = isset( $customizer_rgb['outer_rectangle_color'] ) ?
				imagecolorallocate($im,$customizer_rgb['outer_rectangle_color'][0], $customizer_rgb['outer_rectangle_color'][1],$customizer_rgb['outer_rectangle_color'][2]) :
				$blue;

$middle_rectangle_color = isset( $customizer_rgb['middle_rectangle_color'] ) ?
				imagecolorallocate($im,$customizer_rgb['middle_rectangle_color'][0], $customizer_rgb['middle_rectangle_color'][1],$customizer_rgb['middle_rectangle_color'][2]) :
				$orange;

$inner_rectangle_color = isset( $customizer_rgb['inner_rectangle_color'] ) ?
				imagecolorallocate($im, $customizer_rgb['inner_rectangle_color'][0], $customizer_rgb['inner_rectangle_color'][1], $customizer_rgb['inner_rectangle_color'][2]) :
				$gray;

$first_text_color = isset( $customizer_rgb['first_text_color'] ) ?
				imagecolorallocate($im, $customizer_rgb['first_text_color'][0], $customizer_rgb['first_text_color'][1], $customizer_rgb['first_text_color'][2]) :
				$red;

$second_text_color = isset( $customizer_rgb['second_text_color'] ) ?
				imagecolorallocate($im, $customizer_rgb['second_text_color'][0], $customizer_rgb['second_text_color'][1], $customizer_rgb['second_text_color'][2]) :
				$black;
It’s necessary for the array keys for
$customizer_rgbto match the unique ids for our customizer settings. For example, line 3, above, is the variable for our “Outer Rectangle Color” setting. It checks for$customizer_rgb['outer_rectangle_color']. Yes,outer_rectangle_coloris the exact key for that customizer setting.And notice on line 5, the default color is set to
$blue. The rest of the variables are set to their own default colors. These color variables, of course, were already defined in the script in the// Define colorssection (see the script in Step 1).So, now, this block of code with these 5 variables will be inserted into the image script, after the
// Define colorssection. In other words, right before the// Color the imagesection on line 20 (in the script in Step 1).Now, we are going to modify the
// Color the imagesection. There are 3imagefilledrectanglewhich have their color passed as the last argument. The first is$blue, the second one is$orange, the third one is$gray. We are going to change those 3 colors; instead, we are going to use the variables we just created.- Change
$blueto$outer_rectangle_color. - Change
$orangeto$middle_rectangle_color. - Change
$grayto$inner_rectangle_color.
In the image script, after the
// Color the image, you’ll see the// Add text to the imagesection. In this section, there are twoimagestringwhich have their color passed as the last argument. The first is$red, the second one is$black. We are going to change those 2 colors to use the variables we just created.- Change
$redto$first_text_color. - Change
$blackto$second_text_color.
- Change
- We are finally finished. Now, you can go to the WordPress customizer at “Appearance –> Customize” and click on the “My Custom Image” tab. You’ll be able to live preview the colors in the image. When you save your changes, these color changes will take effect wherever you use the image script in the plugin.
Questions and Comments are Welcome