 This page is part of the Beginner’s Tutorial: Learn How To Setup, Manage Your Own VPS/Cloud Server With Multiple WordPress Sites – For Beginners.
In this section, we will optimize the server for WordPress.
This is for Ubuntu 24.04 which we walked you through setting up in the Beginner’s Tutorial linked above.
This picks up at the end of the previous tutorial, so you should already be logged in to your server. Run the following commands either in Git Bash or your terminal.
Optimize Apache
cd /etc/apache2/
sudo nano apache2.conf
Scroll to end of file, and position the cursor directory under this line:
IncludeOptional sites-enabled/*.conf
Insert this:
# http2
Protocols h2 http/1.1

# events mpm
<IfModule mpm_event_module>
StartServers            5
ThreadsPerChild         25
MaxRequestWorkers       400
MinSpareThreads         200
MaxSpareThreads         400
MaxConnectionsPerChild  10000
</IfModule>
Save the file: Ctrl + o, then press Enter.
Exit the file: Ctrl + x.
Continue to do this:
sudo a2enmod http2
Don’t reload apache yet.
cd conf-available/
Create a new file:
sudo nano servername.conf
Paste this contents into the file:
ServerName localhost
Save the file: Ctrl + o, then press Enter.
Exit the file: Ctrl + x.
Continue to do this:
sudo a2enconf servername
Look for “Syntax OK”:
sudo apachectl configtest
sudo systemctl reload apache2
Optimize MariaDB
Go to your home directory:
cd
Open the MariaDB console:
sudo mysql
Check the query cache variables:
show variables like 'query_cache_%';
Make sure this one of “off”:
| query_cache_type | OFF |
If it’s not off, you can turn it off with this command:
SET GLOBAL query_cache_type = OFF;
Exit from the MariaDB console:
exit
Change the mariadb config file:
cd /etc/mysql/mariadb.conf.d/
Make a backup of the file:
sudo cp 50-server.cnf 50-server.cnf.bak
Open the file:
sudo nano 50-server.cnf
Scroll down to underneath the comment #tmpdir. Make sure that you’re in the [mysqld] section. Under this line: #tmpdir = /tmp, insert this:
# Performance Schema
performance_schema=ON
performance-schema-instrument='stage/%=ON'
performance-schema-consumer-events-stages-current=ON
performance-schema-consumer-events-stages-history=ON
performance-schema-consumer-events-stages-history-long=ON
Save the file: Ctrl + o, then press Enter.
Exit the file: Ctrl + x.
Restart the mariadb service:
sudo systemctl restart mariadb
Open the file again:
sudo nano 50-server.cnf
Scroll to underneath the Performance schema we just pasted above. Find the line:
#skip-name-resolve
…and remove the # to enable the line, so it should end up looking like this:
skip-name-resolve
Save the file: Ctrl + o, then press Enter.
Exit the file: Ctrl + x.
Restart the mariadb service:
sudo systemctl restart mariadb
Whenever setting any innodb directive, you must:
1. first stop the mariadb service
2. set the directive
3. restart the service
Now, do it:
-
Stop the mariadb service:
sudo systemctl stop mariadb
-
Open the file again to set the innodb rules:
sudo nano 50-server.cnf
Search for:
innodbPosition the cursor under the line:
#innodb_buffer_pool_size = 8GPaste these 2 lines, but MODIFY THE VALUES IF NEEDED based on how many gigs of memory your server has:
For a server with 2GB of memory:
innodb_buffer_pool_size = 1600M
innodb_log_file_size = 400M
Here is an image to show what values to use for either a 1GB, 2GB, or 4GB memory server:
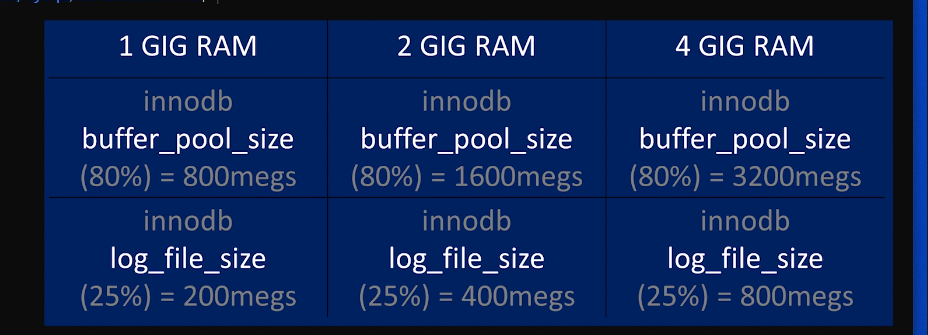
Use this to see what innodb settings to use in the above block, depending on whether you have a 1GB, 2GB, or 4GB memory server. But don’t use “megs” when you enter the value in the file; use “M” instead.
Save the file: Ctrl + o, then press Enter.
Exit the file: Ctrl + x.
Start the mariadb service:
sudo systemctl start mariadb
Optimize PHP8.1-fpm
For Future Reference: to clear the php opcache
Option 1: restart php-fpm in terminal or Git Bash
Option 2: WordPress plugin “Flush Opcache”
Option 3: If using W3TotalCache plugin, it has a setting to do this.
Moving on to optimize PHP:
cd /etc/php/8.1/fpm/
Open the php.ini file:
sudo nano php.ini
1. upload_max_filesize
Search for:
upload_maxSet
upload_max_filesize = 100MNote: Some developers for Elementor (The Elementor WordPress plugin) say that
upload_max_filesizeshould be set to 512M when using Elementor.2. post_max_size
Search for:
post_max_Set
post_max_size = 125MNote: Some developers for Elementor (The Elementor WordPress plugin) say that
post_max_sizeshould be set to 516M when using Elementor.3. max_input_vars
Search for:
max_input_varsto find this line:;max_input_vars = 1000
Uncomment the line by removing the semicolon from the beginning of the line, and change
1000to3000. The line should look like this:max_input_vars = 3000
Note: The value of
3000may need to be increased depending on special plugins or themes. Check the plugin or theme documentation.Note: If you will be using Elementor (the WordPress plugin) , you need to set this to 4000.
4. memory_limit
Just below the above line, set
memory_limit = 256MNote:
512Mis recommended if you’re using WooCommerce or WPML (the WordPress plugins).5. opcache.enable
Search for:
opcacheto find this line:;opcache.enable=1
Opcache is enabled by default, but you should enable this line anyway. Remove the semicolon from the beginning of the line to enable it.
6. opcache.memory_consumption
Then, 2 lines down, find:
;opcache.memory_consumption=128
Remove the semicolon to enable the line, and set it to
192so it becomes:opcache.memory_consumption=192
7. opcache.interned_strings_buffer
On the next line:
;opcache.interned_strings_buffer=8
Remove the semicolon to enable the line, and set it to
16so it becomes:opcache.interned_strings_buffer=16
8. opcache.max_accelerated_files
On the next line:
;opcache.max_accelerated_files=10000
Remove the semicolon to enable the line, and leave the number as is for now.
Note: We will come back to this setting later.
9. opcache.validate_timestamps
Scroll down to:
;opcache.validate_timestamps=1
Remove the semicolon to enable the line, then decide:
What’s the difference between a development server and a production server?– A Development server as a server that is used for developing and testing websites.
– A Production server is a server that is used to host the live website.
For Production server, set it to
0(zero):opcache.validate_timestamps=0
Notes: When set to
0, you must reset the OPcache manually or restart the webserver for changes to the filesystem to take effect.For Development server, set it to
1(one):opcache.validate_timestamps=1
Notes: If set to
1, OPcache will check for updated scripts everyopcache.revalidate_freqseconds.10. opcache.revalidate_freq
This is how often to check script timestamps for updates, in seconds. The default is
2seconds.0will result in OPcache checking for updates on every request. This configuration directive is ignored ifopcache.validate_timestampsis disabled.We will enable this anyway:
For
;opcache.revalidate_freq=2, remove the semicolon to enable the line.While developing a site, you may want to set a higher number of seconds to prevent overworking the server. For example:
opcache.revalidate_freq=30
Or, you can leave it at the default
2seconds.11. ONLY IF USING ELEMENTOR:
Do the following only if you will be using Elementor on any of your WordPress sites on this server:
-
Search for
max_execution_timeand set it to400so it becomes:max_execution_time = 400
-
Search for
max_input_timeand set it to400so it becomes:max_input_time = 400
-
Search for
allow_url_fopenand set it toOnso it becomes:allow_url_fopen = On
-
Search for
allow_url_includeand set it toOnso it becomes:allow_url_include = On
Save the file: Ctrl + o, then press Enter.
Exit the file: Ctrl + x.
Restart the PHP service to apply the changes:
sudo systemctl restart php8.1-fpm
Coming up next
In the next tutorial, we will install WordPress and set up the first WordPress site on your server.
-
Questions and Comments are Welcome